 Art Hedrick
Avoiding the 7 Deadly Sins of Stamping: Part 2—Out-of-Sequence Timing
March 29, 2024Comments
In Part 1 of this series, I discussed the importance of knowing and understanding how a fundamental understanding of material behavior affects the decision-making process and how taking action without it is the first deadly sin of stamping. In Part 3, in the June/July 2024 issue, I will finish discussing timing of a stamping die and delve into the different operations. I also will present some tips on resolving pilot release or feeding problems.
I’m reasonably confident that most of you reading this column have heard the simple phrase “timing is everything.” Many of the problems that I have consulted on were resolved by analyzing and correcting poor timing of the dies, feeder and press. Out-of-sequence timing is the second deadly sin of stamping.
Although timing is not the only consideration for a successful stamping operation, it is a critical one. Metal formers must pay close attention to timing fundamentals for the die, feed equipment and press.
When I conduct a die-troubleshooting or die-maintenance conference, I introduce a very fundamental timing process. Although using this process certainly will not solve all problems, it serves as a good place to start before performing any work on the tool:
- Locate the part or strip.
- Secure the part or strip.
- Perform the work.
These steps may seem obvious, but, in my consultation work, I have encountered problems many times that stemmed from not following these steps.
Keep in mind that these steps must always be performed in the correct order as written above. For example, if you try to bend the part without first properly locating it in the press, the bend likely will be in the wrong position and the part geometry will not be correct. If you locate the part and then attempt to bend it without securing it, it likely will move during the bending process, resulting in an improper or mislocated bend. If you secure the part to the die with a high-pressure pad and then try to locate it and move it with a pilot or gauge, it likely will not move. The worst-case scenario: performing bending, flanging, drawing or cutting, and then attempting to hold the part down with the pressure pad, and then attempting to locate the part after all of the work has been performed. This completely reverses the process shown above. Not good.
Let’s take a detailied look at each of these steps.
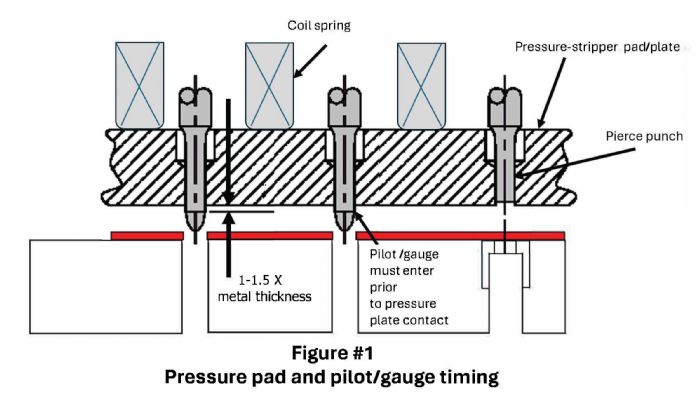 Because it is critical that the parts be allowed to move freely in the die so that the gauge pins, pilots or locators can easily locate them, the device that moves the part from station to station must release it before the gauge pins or pilots engage. This basic principle applies not only to progressive dies, but to transfer systems as well. In progressive dies, this timing between the feeder and the tooling is commonly referred to as pilot release or feed release. When a transfer system is used, such as a two- or three-axis layout utilizing transfer rails and part pick-up fingers, the transfer fingers/grippers must release the part before locating it, or they must be designed to allow the part to move freely within the fingers, enabling the pilots, gauges or locators to precisely locate the part.