Deep Drawing—Advanced Topics
July 1, 2008Comments
In this month’s feature article, Deep Drawing from A to Z, page 16, the fundamental principles of deep drawing flat-bottomed cups and rectangular boxes is discussed. But as one might expect, many deep-drawn cups and boxes do not have flat bottoms and straight walls. What’s more, nonsymmetrical cup draws are rather commonplace.
Deep-drawn cups may include tapered walls, hemispherical bottoms or dome-shaped bottoms. All three designs have one thing in common: the need for high blankholder forces. If the blank-holder forces are not high enough, loose material between the punch-face contact and the die-entry radius will not be stretched tightly over the punch face. When loose material is present, buckles, waves and wrinkles can easily form in the unsupported region.
Cups with tapered walls are sometimes referred to as cones. Drawing a cone shape directly from a flat blank requires substantial blankholder forces. The likelihood of the material breaking (fracturing) early in the punch stroke is very high because of the small punch-face diameter and tight radius in the bottom of the cup.
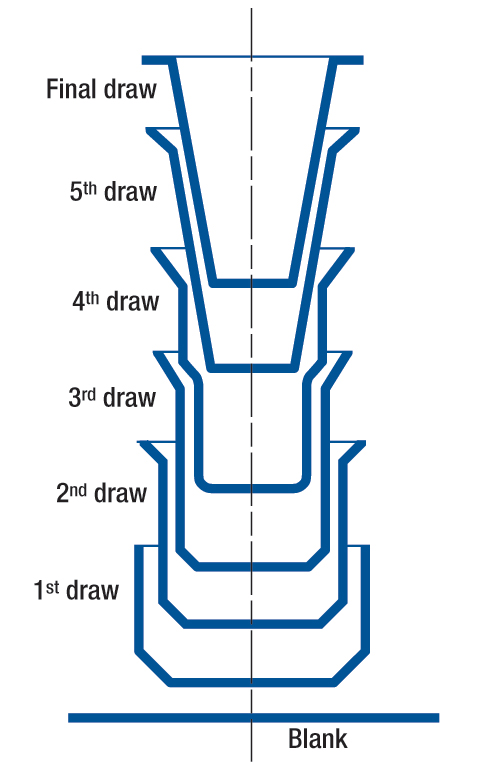 |
| Fig. 1 |
Cups designed with full-hemispherical bottoms or partial dome shapes, require special consideration of the forming process. This is because the process changes from simple bending of material over the punch radius, as is the case with flat-bottomed cup drawing, to stretch forming. Thus, the drawing of dome-shaped cups combines stretching and drawing.
When the dome-shaped punch contacts the blank, material stretches in all directions. To cause this stretching, the blankholder forces must be high enough to keep the blank from drawing in toward the cavity too soon. If the blank begins to flow too soon, the material may begin to “pucker” in the unsupported regions. The term pucker is convenient to use in order to distinguish between stretch-forming wrinkles and conventional-draw wrinkles.
The closer the dome-cup design comes to assuming a full hemispherical shape, the greater the importance of balancing blankholder forces and material flow. The blank must begin to draw inward immediately after the stretch forming of the dome is complete. Otherwise, the material will thin too much, causing the dome to tear or fracture.
Since the punch force needed to fracture the bottom of a dome-shaped cup is less than that for a flat-bottomed cup, the percent reduction or cup height should be reduced.
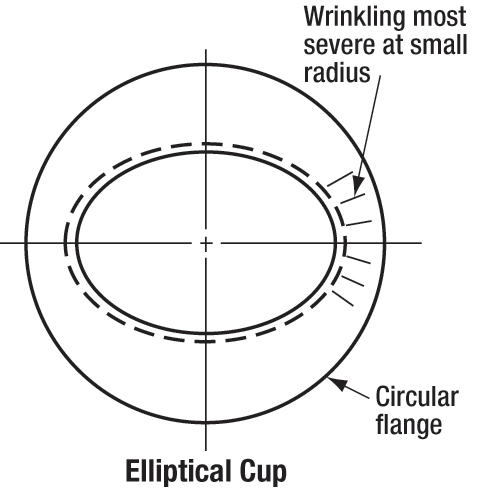 |
| Fig. 2 |
Compressive forces in elliptical-cup drawing peak in the area of the smaller radius. Failures such as tearing and fracturing more likely will occur in this area. Some reduction in compressive loads is possible by notching the blank in the smaller radius area, providing that the final product trim is not adversely affected. Again, it may be necessary to reduce the percent reduction or cup-wall heights in order to successfully deep draw elliptical shapes.
A flat side on an otherwise round cup represents another example of a nonsymmetrical cup (Fig. 3). The blank material at the flat portion of the cup may flow too rapidly and leave loose material in that portion of the cup wall. The material flow in the area of the flat may need to be controlled or restricted
by the use of a draw bead.
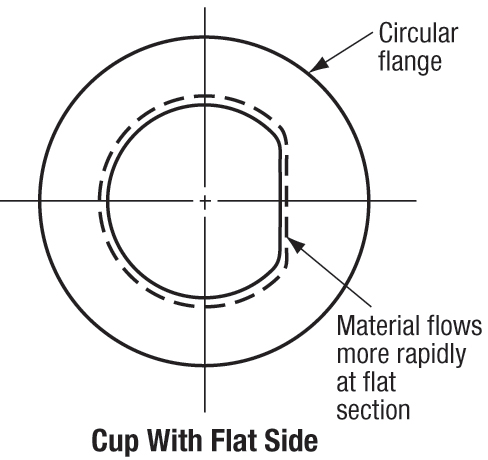
Fig. 3
Draw beads assist in better controlling blank movement, particularly when deep drawing irregular shapes. The draw beads force material to bend and unbend before reaching the die-entrance radius. This creates a restraining force on the sheetmetal that causes the material to enter the die cavity at a reduced rate of speed. The height, shape and size of the draw beads and bead-cavity radii determine the amount of retraining forces generated. Altering the height of the bead also increases or decreases the amount of restraining force.
Higher blankholder forces are required in order to set the draw beads. Draw beads must be fully set before any material flow starts. A special type of draw bead known as an active draw bead can be used to lock out material near the bottom of the draw stroke to promote stretching of the drawn part, reduce wrinkles and control springback. These draw beads sit in a pocket during the drawing process and then are raised (usually by pins located under the beads) a few fractions of an inch from the bottom of the press stroke to dramatically increase the retraining forces on the blank flange. The distance active draw beads travel can be adjusted to finely tune the amount of restraining forces required to produce an acceptable part. MF
View Glossary of Metalforming Terms
Technologies: CNC Punching, Pressroom Automation