


 Stuart Keeler
Solutions Without Data? Simply Guesses
December 1, 2014Comments
Often we hear employees in the pressroom say things like, “I solved an identical problem 12 years ago, by adding double draw beads on the opposite side of the binder from the tear.” Take that statement and analyze it logically. Each stamping has a large number (50 or more) of interacting inputs that determine the exact parameters of the final part. Even if a few measurements (data) were made, most likely they no longer are available for comparison.
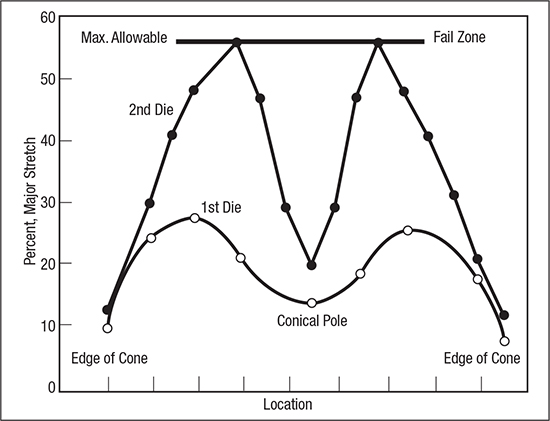 |
| Fig. 1—The stamped part tore in the eighth die due to excessive stretch in die two. |
Also, how many measurements were made of the inputs to the stamping having the current problem? Probably only a few. Therefore, using the suggested correction used on the 12-yr.-old stamping rarely will correct the current problem, and may make it worse.
Opinions without data are simply guesses. Solutions are procedures designed to solve a problem—a final corrective action. Before even suggesting a solution, we first must identify the causes of the problem. In many problem-solving meetings, team leaders will list the likely problem sources on a white board, and the team will vote to select those to be moved up to the solution stage. Hopefully they have the problem part in the room with them, providing data to fuel the discussion.
In a press shop, the stampings house the data because they undergo the interaction of the inputs, and summarize the results in the stamping as it exits the press. To obtain the data, one must converse with the stamping, asking it questions that can be answered by surveying the data.
May sound ridiculous, but I do it every time I encounter a problematic stamped part. I etch a small-diameter circle-grid pattern on the blank and, after forming, measure the amount, direction and gradient of stretch. I highlight high stretch areas and plot the stretch patterns on the forming-limit diagram (FLD) to determine the severity of the deformation in those areas. Red indicates probable failure, yellow shows where sufficient stretch failure may occur with changes of inputs, and green indicates acceptable stamping. In some cases, ultrasonic thickness gauges can provide a quick check. All of these procedures represent ways in which a stamped part communicates the relevant data to outline the details of the problem, so that one need-not guess as to the solutions.
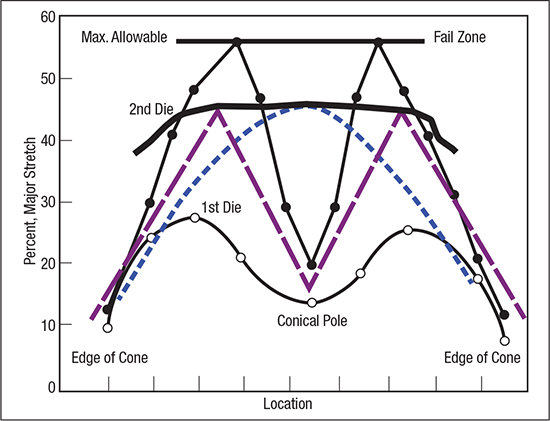 |
| Fig. 2—The blue dotted line indicates the additional stretch achieved by the modified first die. This allowed less stretch (dashed black line) in the second die to reduce the peak stretch away from failure and limit the sharp gradients. |
For example, consider a heavy-gauge stamping made in 10 progressive dies. In the eighth die, a stretch-formed cone was tearing in a ring below the top. Attempts by the tool and die department to eliminate the tear proved unsuccessful. To begin studying the tear, we etched three blanks with a circle-grid pattern and pulled a formed gridded blank after the first, second and eighth dies. The circle grids of the eighth die (at the tear) were in the red (failure) FLD zone. Failure resulted from excessive localized stretch.
Since the bulk of the forming occurred in the first and second dies, circle grids on these stampings provided useful data about the forming process (Fig.1). The stretch gradients (two sets of peaks) represent a conical dome cut down the middle from the conical pole to the bottom edge of the cone. The band of necking (thinning) shows the low stretch at the pole, a sharp increase crossing the ring of necking and the steep decrease in stretch to the blank.
What Does the Data Tell Us?
1) Changing the eighth die will not correct the problem, since the deformation in the ring zone already is at the edge of the red failure zone after the second die.
2) The first die starts the required dome height by creating a cone of significant stretch.
3) The second die extends the height of the cone with additional deformation that greatly increases the amount of stretch and narrows the width of the cone.
4) The sheetmetal is locked at the bottom of the cone and additional material cannot feed into the deformation zone from the surrounding areas of the stamping. This means that the height of the cone is proportional to the total area created by the plotted stretch curves.
5) Having the punch travel more deeply in the first die will not help, because the first die gradients will just enlarge into the shape previously generated by the second die.
What clues do the data available in Fig. 1 offer to support a possible correction?
1) The center zone after forming in the first die shows a stretch level below the two peaks. In the second die, the peaks grow to extreme height but the center zone still undergoes almost no additional deformation.
2) Extra stretch, allowing more cone height, was created by transferring the majority of first-die stretch to the center area (dotted line in Fig. 2). The smaller the punch radius the more the stretch becomes concentrated in the center. Therefore, operators welded an additional small-diameter punch on top of the pole of the first die punch. As the modified punch contacts the blank, the additional punch generates a large amount of center stretch. As the height of the cone grows, the blank then contacts the larger initial punch.
3) When forming the stamping in the second die, only a small amount of additional deformation was required (heavy dashed line in Fig. 2). The three equal-height peaks now have a relatively constant amount of stretch at the head of the punch, well below the red zone.
The stamping was made successfully for the next 10 years.
MFView Glossary of Metalforming Terms
Technologies: Quality Control
Comments
Must be logged in to post a comment. Sign in or Create an Account
There are no comments posted. Quality Control
Ascential Technologies Appoints Divisional CEO to Specialty ...
Wednesday, April 24, 2024
Brinell, Rockwell and Vickers Hardness Testing: Use and Misu...
Daniel Schaeffler Friday, April 1, 2022
 Quality Control
Troubleshooting Sheet Metal Forming Problems, Part 2: The St...
Daniel Schaeffler Friday, February 26, 2021
 Quality Control
Cobot Setup Offers Pick-and-Place for Material and Product S...
Wednesday, April 29, 2020
 Video
Video