
Page 43 - MetalForming July 2013
P. 43
duced without the proper input of weld current and force.
For example, a standard 100-kVA RWMA Size 2 press-type spot welder with a relatively short 18-in. throat depth must have an air-cylinder diam- eter large enough to produce at least 4000 lb. of welding force at 80-psi incoming air pressure. Note: Weld-force requirements are less for longer throat depths.
Similarly, an RWMA-standard 100- kVA transformer must be designed with copper windings and an electrolytic steel core large enough to produce a short circuit (tip-to-tip, without steel in the throat) secondary output of 31,000 A at 50-percent-duty cycle. And, an RW machine’s secondary amperage reading should be measured as RMS (root mean square), rather than the higher peak reading sometimes cited. Resist- ance-welding schedules are based on RMS, or effective current.
Understanding kVA (Thermal) Rating
The specified duty cycle of a trans- former also is important, because kVA (kilovolt amps, a thermal rating), can be inflated by citing a lower duty cycle than this industry standard. For exam- ple, the same RW transformer rated to 100 kVA at 50-percent-duty cycle can be rated 224 kVA at 10-percent-duty cycle.
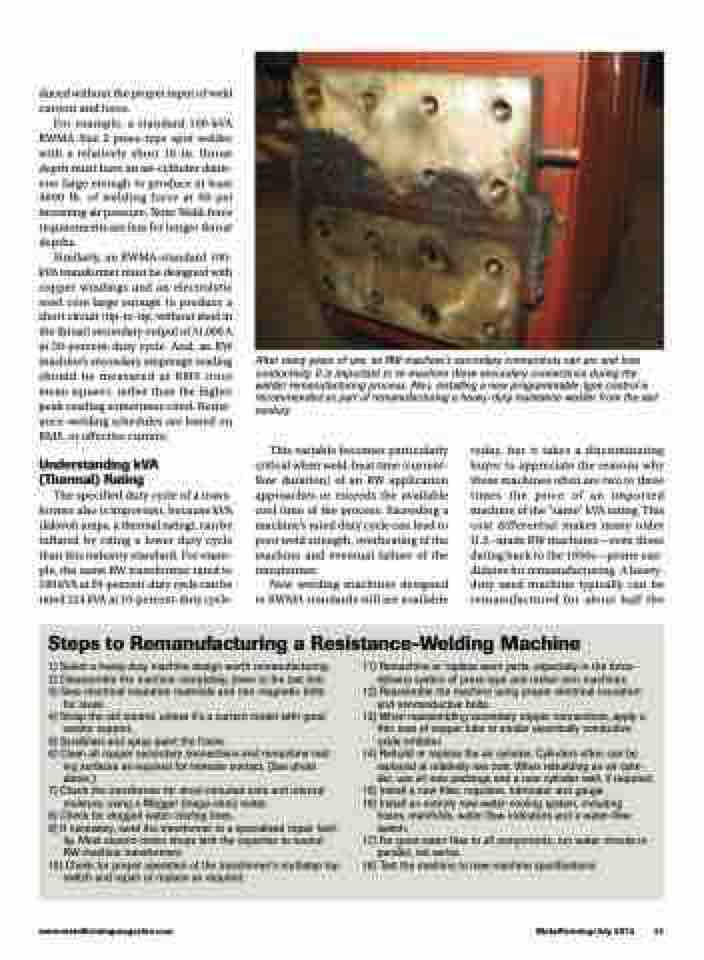
After many years of use, an RW machine’s secondary connections can arc and lose conductivity. It is important to re-machine these secondary connections during the welder remanufacturing process. Also, installing a new programmable-type control is recommended as part of remanufacturing a heavy-duty resistance welder from the last century.
This variable becomes particularly critical when weld-heat time (current- flow duration) of an RW application approaches or exceeds the available cool time of the process. Exceeding a machine’s rated duty cycle can lead to poor weld strength, overheating of the machine and eventual failure of the transformer.
New welding machines designed to RWMA standards still are available
today, but it takes a discriminating buyer to appreciate the reasons why these machines often are two to three times the price of an imported machine of the “same” kVA rating. This cost differential makes many older U.S.-made RW machines—even those dating back to the 1950s—prime can- didates for remanufacturing. A heavy- duty used machine typically can be remanufactured for about half the
Steps to Remanufacturing a Resistance-Welding Machine
1) Select a heavy-duty machine design worth remanufacturing. 2) Disassemble the machine completely, down to the last bolt. 3) Save electrical insulation materials and non-magnetic bolts
for reuse.
4) Scrap the old control, unless it’s a current model with good
vendor support.
5) Sandblast and spray-paint the frame.
6) Clean all copper secondary connections and remachine mat-
ing surfaces as required for intimate contact. (See photo
above.)
7) Check the transformer for short-circuited coils and internal
moisture, using a Megger (mega-ohm) meter.
8) Check for clogged water-cooling lines.
9) If necessary, send the transformer to a specialized repair facil-
ity. Most electric-motor shops lack the expertise to rewind
RW-machine transformers.
10) Check for proper operation of the transformer’s multistep tap
11) Remachine or replace worn parts, especially in the force- delivery system of press-type and rocker-arm machines.
12) Reassemble the machine using proper electrical insulation and nonconductive bolts.
13) When reassembling secondary copper connections, apply a thin coat of copper lube or similar electrically conductive oxide inhibitor.
14) Rebuild or replace the air cylinder. Cylinders often can be replaced at relatively low cost. When rebuilding an air cylin- der, use all new packings and a new cylinder wall, if required.
15) Install a new filter, regulator, lubricator and gauge.
16) Install an entirely new water-cooling system, including
hoses, manifolds, water-flow indicators and a water-flow
switch.
17) For good water flow to all components, run water circuits in
parallel, not series.
18) Test the machine to new-machine specifications.
switch and repair or replace as required.
www.metalformingmagazine.com
MetalForming/July 2013 41
